Skill Level:
Crafting Time:
Technique(s):
Material(s):
Category:
Tag(s):
Share This Craft
Search Crafts
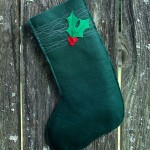
O Stocking Made of Burlap

This humble material has inspired us to make burlap table decorations, a burlap table runner, and now a burlap stocking. It can be a little difficult to work with burlap; the threads unravel easily, and you have to be careful when cutting it since it tends to warp. Even though burlap is a utility fabric, the loosely woven strands give it a delicate nature. To counteract this, we reinforced the burlap with cotton fabric. The cotton is sewn to each individual piece of burlap, and then all the pieces are sewn together. When complete, you have a charming stocking with touches of burlap’s rough and earthy qualities.
Supplies & Tools:

- Printable template (download here)
- Tape
- 0.5 yard natural-colored burlap
- 0.25 yard red burlap
- 0.5 yard natural-colored cotton fabric (such as muslin)
- Scissors
- Straight pins
- Thread to coordinate (white, red)
- Sewing machine
- 0.5" wide ribbon
- Ruler
- Iron
Directions:
Cut Out Pieces:
- Print pattern. We printed the pattern from Adobe Acrobat Pro and selected the following options: File > Print > a print window pops up > under Pages & Handling, select Poster > change Tile Scale to 200% > select checkbox for Cut Marks. Now click the print button.
- Piece pages together. Use tape as needed.
- Cut out template pieces.
- Iron fabric to get rid of any wrinkles.
- Pin stocking pattern (#1) to natural-colored burlap and cut out 2 pieces. Remove pins and set aside burlap pieces.
- Pin stocking pattern (#1) to cotton fabric and cut out 2 pieces. Remove pins and set aside cotton pieces.
- Pin the trim pattern (#2) to red burlap and cut out. Remove pins and set burlap piece aside.
- Pin trim lining pattern (#3) to cotton fabric and cut out. Remove pins. Set pins and cotton piece aside.
- Cut a piece of ribbon that is 7" long. Set aside.
Reinforce Burlap Stocking with Cotton Fabric:
- Lay each burlap piece onto its coordinating cotton piece.
Note: Be sure that you lay the burlap/cotton pieces so that the burlap is on the outer side of the stocking. For example, stack all 4 pieces together. They should be in this order: burlap-cotton-cotton-burlap.
- Separate the stack in half. You should now have the following sets:
- burlap-cotton
- cotton-burlap
- Use pins to hold each set together.

- Adjust stitch setting on sewing machine to a zigzag stitch.
- Take one set and sew a zigzag stitch all the way around the piece. Trim thread. Remove pins and set stocking piece aside.
- Take the other set of stocking pieces and sew a zigzag stitch all the way around. Remove pins.
Reinforce Burlap Trim with Cotton Fabric:
- Take cotton lining piece (#3) and lay it on top of burlap trim piece (#2). Align cotton to one edge of the burlap piece.

- Use straight pins to pin cotton and burlap together.
- With red thread, sew a zigzag stitch along all edges of the cotton fabric (#3).
- Trim thread and remove pins. Set the trim piece aside.
- Remove a few horizontal strands of burlap from bottom edge of red trim to make it look like fringe.
Sew Stocking Pieces:
- Stack stocking pieces together, burlap sides facing each other.
- Use straight pins to secure layers together. Pin in several spots along the edge, leaving top of stocking open.
- Adjust stitch setting on sewing machine to a straight stitch.
- Begin sewing a straight stitch around the stocking. Backstitch at the start and the end of the stitch line (the top corners). Be sure to leave the top of stocking open.
Put Stocking and Trim Pieces Together:
- With stocking inside out (burlap facing in), lay the trim piece (burlap side down) around the opening of stocking.
- Align piece along the top edge with the trim fringe at the bottom.
- Allow the trim piece to hang over the side edge of stocking by 0.5".
- Start pinning trim near the “back side of leg” of the stocking. Place pins about 2" apart.
- Continue pinning along the top edge of stocking.
- When you get to the seam that is the “front of the leg,” fold the seam down (against the stocking) and pin in place.
- Continue to pin all around top edge.
Add Ribbon and Sew Stocking:
- Fold ribbon in half, creating a loop. Place in between layers of trim and stocking. You might need to remove a pin in order to place the ribbon. The loop of the ribbon should be underneath the layers, with the ends sticking out.
Note: Ribbon should be placed near the “back of leg” seam.
- Sew a straight stitch along the stocking. Be careful not to sew your stocking closed.
Finish Sewing Trim:
- Sew the short sides of trim together. Be careful not to sew the stocking into the seam.
Turn Right Side Out:
- Gently turn stocking right side out.
- Fold trim over the stocking.
- Hang by the ribbon.