Skill Level:
Crafting Time:
Technique(s):
Material(s):
Category:
Share This Craft
Search Crafts
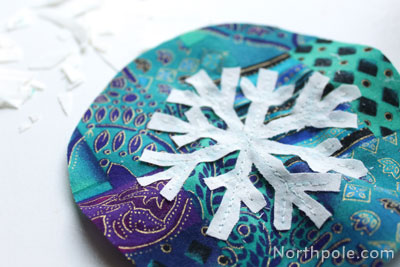
Snowflake Hoop Ornament

Make adorable handmade ornaments—no hand stitching required! Simply sew the snowflake design using a sewing machine. You can use this technique for any size embroidery hoop, but in this article we’ll show you how to make a 4" ornament.
Supplies & Tools:

- Printable template (download here)
- White fabric (6" square or larger)
- Dark color fabric (6" square or larger)
- Small, super-sharp scissors
- Sewing machine
- Thread
- Tailor’s chalk
- 4" embroidery hoop
- Straight pins
Directions:
- Cut out circle template.
- Pin circle template to white fabric and cut out. Remove pins. Repeat for dark fabric.
- Place the snowflake template under the white fabric, and lightly trace the snowflake using tailor’s chalk. Set template and chalk aside.
- Pin the white circle on top of the dark circle.
- Using sewing machine, sew along the arms of the snowflake. Here’s a diagram of how we sewed each arm:

Note: To reduce puckering, we have found a couple things to be helpful. Use a short stitch length. Sew the first two arms with the grain of the fabric, and then proceed to sew the remaining two arms on the bias. - Once finished sewing, bring thread to the back of the fabric and tie off the ends. Trim excess thread.
Note: Did you know you can bring the thread to the back without using a needle? Gently tug on the thread on the back. This will pull a small loop through the surface, which is the thread from the topside. Pull on the loop (a pin is helpful) to bring the thread to the back. Now tie off ends, and trim the thread. - Begin cutting around the snowflake on the white fabric only using your sharp, small scissors. Leave about 3–4mm of fabric on either side of the stitched lines. We used Fiskars Micro-tip Scissors. We prefer to use these because they have chiseled, pointy tips that allow us to cut in small spaces.
- Place the snowflake circle in the embroidery hoop, and pull the edges until taut.
- Trim any excess fabric that is sticking out of the hoop.
- Attach a string or ribbon and hang on your tree.
Elfy Hint:
- In steps 1 & 2, you can cut squares of fabric (instead of circles) and proceed as normal. You might find it is easier to pull the corners of the square to make the fabric taut after it is in the hoop.