Skill Level:
Crafting Time:
Technique(s):
Material(s):
Cardboard
Felt
Foam
Pipe Cleaners
Category:
Tag(s):
Share This Craft
Search Crafts
S'more Snowmen
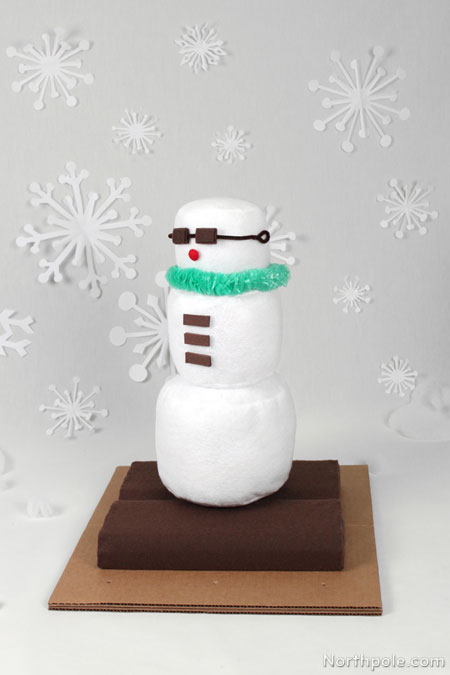
Perfect for a Christmas in July theme, check out these super cute marshmallow snowmen. We made two variations of this project: one snowman is sitting on a chocolate bar & graham cracker, and the other snowman is hanging out with his chocolate-dipped graham cracker surfboard! These snowmen are soft and cuddly (suitable to give as a gift) and would make playful table centerpieces.
In this article you'll learn how to make the following:
- The marshmallow snowman
- The snowman's face & accessories
- Giant chocolate bar
- Giant graham cracker
- A chocolate-dipped graham cracker surfboard
- A snow-covered surfboard stand
Snowman
Supplies & Tools:

- Printable template (download here)
- 0.5 yard white felt
- Pen or marker
- Scissors
- Ruler or measuring tape
- Straight pins
- Sewing machine
- White thread
- Needle
- Poly-Fil®
Directions:
- Print out the template and cut out the 7" circle.
- Lay felt on a flat surface.
- Lay the 7" circle on felt and trace 2 circles with pen.
- Cut out the 5.5" circle template and trace 2 circles on felt.
- Cut out the 4" circle template and trace 2 circles on felt.
- Cut out the felt circles. You should have a total of 6 circles: 2 small, 2 medium, and 2 large.
- Measure and cut the following rectangle pieces:
- Large: 23" x 6"
- Medium: 18.25" x 5"
- Small: 14.5" x 4"
- Match up the circles with the corresponding rectangle piece. Set aside the small and medium sets.
- Take one of the large circles and the rectangle and begin pinning together. Begin by aligning one long edge of the rectangle to the edge of the circle. Pin in place. Continue lining up the rectangle edge with the circle and pin in place. You will probably need to add a pin every 1/2 inch. The ends of the rectangle will overlap by about an inch.
Note: You will not pin or sew the overlapping edges of the rectangular piece yet.
- Now that you have pinned all around the circle, you can begin sewing.
- Align edge of felt circle to the edge of presser foot of sewing machine.
- Begin sewing slowly, using your hands to guide the felt so that it stays aligned with the presser foot at all times. As you sew, use your right hand to gently pull the fabric (from behind the needle) and your left hand to continuously guide the felt.
Note: This part can be a little tricky, so working slowly is the key to getting an even stitch.
- Continue sewing all the way around and overlap the first stitches by about an inch. Raise presser foot and trim thread.
- Remove pins.
- Pin the remaining large circle to the other side of rectangle piece.

- Sew. Remove pins and set aside.
Note:The overlapping edges of the rectangular piece are still not sewn. - Repeat steps 9–16 with the medium circles and rectangle.
- Repeat steps 9–16 with small circles and rectangle.
- Turn each marshmallow right side out and stuff with Poly-Fil® (using the opening in the side of the marshmallow, that is, the overlapping edges).
- Using needle and thread, hand-sew the overlapping ends of each marshmallow.
- Hand-sew the medium marshmallow on top of the large marshmallow. Use pins to hold them in place as you sew.
- Sew small marshmallow on top of the medium one, using pins to hold in place.
- The body of the snowman is complete. Now it’s time to add accessories.
Sunglasses, Nose, Buttons, & Lei
Supplies & Tools:

- Brown felt
- Red felt
- Brown pipe cleaner
- Mini hot glue gun & glue sticks
- Red thread
- Needle
- Ruler
- Scissors
- Lei
Directions:
Chocolate Sunglasses:
- Measure and cut 4 pieces that are 0.75" x 1" out of brown felt.
- Measure and cut 2 pieces that are 0.5" x 0.75" out of brown felt.
- Lay 1 brown pipe cleaner on a flat surface.
- Place 2 of the larger pieces underneath the pipe cleaner and near the center. Glue in place.
- Lay the other 2 large pieces on top of the pipe cleaner, directly on top of each existing pieces. Glue in place.
- Place each of the smaller pieces in the center of the larger pieces, and glue in place.
- After glue dries, bend pipe cleaner in a circle shape so that it will hug the snowman’s head.
- Fold each end back, forming a small loop and twist to hold in place.
- Place sunglasses on snowman’s head.

Red Candy Nose:
- Cut two small circles from red felt, about 0.75" in diameter.
- Using red thread and a needle, whip stitch edges about halfway around the circles. Fill with small felt scraps, and continue sewing all the way around.
- Glue nose in the middle of snowman’s face.
Chocolate Buttons:
- Cut 9 pieces of brown felt that are 1.25" x 0.5".
- Stack pieces in groups of 3.
- Within each group, glue the 3 pieces together.
- Glue the chocolate buttons on the snowman’s tummy (the middle section).

Lei:
- Take lei and locate the knot.
- Untie the knot, or simply cut it.
- Unravel plastic petals to shorten the lei to about 17".
- Trim the plastic and tie strings in a double-knot. Trim excess string.
- Put on snowman.
Ideas from the Elves:
- Use black pompoms as coal eyes and buttons
- Cut out mittens from any color felt. Connect mittens with a ribbon and hang on the snowman’s neck.
- Cut a long skinny piece of felt and fray the ends to look like a scarf. Wrap around the snowman’s neck.
- Buy a mini Santa hat (or make one!) and place on his head.
- Glue 2 large pompoms to a piece of felt and place on snowman’s head for earmuffs.
Chocolate Bar
We found these foam pieces in the Craft Cottage. You can reuse foam that you may have lying around the house or you can purchase it from a craft store.
Supplies & Tools:

- Foam
- 2 Popsicle sticks
- 0.5 yard brown felt
- Scissors
- Rotary cutter
- Metal ruler
- X-Acto
- Cutting mat
- Extra X-Acto blades
- Straight pins
- Mini hot glue gun & glue sticks
- Pen or tailor’s chalk
- Optional: measuring tape
Directions:
Cut & Shape Foam:
- Lay cutting mat on a flat surface.
- Working over cutting mat, cut 2 foam pieces to desired size. Each of our pieces measured 11.5" (L) x 4.75" (W) x 1.5" (D).
- As you continue working on cutting mat, use an X-Acto to bevel the top two long edges of each piece of foam. Discard shavings. The X-Acto needs to be very sharp; if foam is crumbling or is not cutting, then you may need to replace your blade.

- Take one foam piece and turn it so that one long surface is facing you. Mark two x’s that are 0.75" from bottom edge. One x should be on the left half of the face and the other x should be on the right half of the face.
- At each x mark, insert a popsicle stick 1/3 way into foam, with flat side parallel to work surface.
Note: Check to make sure that sticks are parallel with work surface by bringing your eye down to that level. (Just like checking the liquid level in a glass measuring cup!) It’s very important that the sticks are as parallel as possible; otherwise the stick can break through the surface of the foam when the two pieces are pushed together (as in step 8).
- Now rotate foam so that the short face is aligned with the edge of cutting mat (or table). Popsicle sticks should be pointing right.
- Place other foam piece on the right side of the popsicle sticks, and line up with the edge of cutting mat.

- Slowly push pieces together, the sticks should be inserted into both pieces of foam. A little gap between the pieces is okay, but shouldn’t be more than 0.25".

Cut & Add Felt:
- Measure dimensions of bottom surface of foam: length, width, and depth. Our measurements: (L)=11.5" (W)=9.5" (D)=1.5"
- Calculate amount of felt that you need to cover the bottom and the top.
- Formulas for bottom surface:
- Felt Length = (L) + (D) + (D) + 1"
- Felt Width = (W)
- Formula for top surface:
- Felt Length = (L)
- Felt Width = (W) + (D) + (D) + 1"
- Formulas for bottom surface:
- Lay felt on a flat surface. Cut out felt for bottom surface and for top surface.
- Lay bottom surface felt piece on flat surface. Position foam in the center.
- Fold felt up over each short side.

- Cut a 0.5" slit in felt where the felt is directly in front of the “valley”.

- Glue corners down, over the beveled edges.
Note: Be sure to use a mini hot glue gun, since the standard size glue gun is too hot and can melt the foam. - Repeat for opposite side.
- Glue all other edges to foam.

- Now place top surface felt on the foam.
- Begin gluing felt to foam. Use pins to hold the felt in place while gluing, if desired.
- First, glue felt to one of the “bars.”

- Glue along the edges of the bar. Repeat for the other end of the bar.

- Gently press felt into the “valley” with a popsicle stick or a ruler. Glue, if desired.

- Continue gluing felt to the rest of the foam. Remove pins and set aside.

- Trim any edges, if necessary.

Graham Cracker
Supplies & Tools:

- Cardboard
- Loctite spray adhesive
- Cutting mat
- X-Acto
- Pencil
- Paintbrush
- Metal ruler
- Kraft paper
Directions:
- Lay cutting mat on a flat surface.
- Lay cardboard on top of cutting mat.
- Using ruler and pencil, measure three 15" squares on a piece of cardboard.
- Cut out squares using X-Acto and metal ruler. Set 2 squares aside.
- Take one square lay on flat surface.
- Draw a small tick mark at the halfway point, near the bottom and top edge. Using ruler as a guide, take the back end of a paintbrush (or a pen) and score the cardboard. Repeat a couple times until the cardboard has an indented line. You may also fold along this line if you’d like to make the crease more dramatic.
Note: This line should be perpendicular to the corrugated lines of the cardboard for the most noticeable effect. - Now that you have 2 halves to your cracker, mark small dots on the surface to imitate the holes that are in graham crackers.
- Poke through holes with pin or X-Acto tip. Then enlarge the holes with the wooden tip of a paintbrush (the tip of a pen will work, too).
- Stack squares together, grab a large piece of kraft paper and your spray adhesive, and head outside.
- You’ll need to be in a well-ventilated area, ideally an outside area that is a good distance from people, cars, etc. Lay kraft paper on a flat surface, and follow instructions on the can of spray adhesive to glue pieces together. We used Loctite High Performance Spray Adhesive. Spray both surfaces, wait a minute to let them dry, and then carefully stick them together. Repeat for remaining piece. Be sure that your piece with the holes is on top!
- Discard newspaper and return to your work area.
- Clean up edges, if necessary, using an X-Acto and a cutting mat.

Surfboard for the Surfer S'more
In case you were wondering if snowmen like to catch some waves and sun, they do—with a chocolate-covered graham cracker surfboard! Well, it’s not really chocolate or graham, but it sure does look like it!
Supplies & Tools:

- Cardboard
- Loctite spray adhesive
- Straight pins
- Scissors
- Pencil
- 0.25 yard brown felt
- Cutting mat
- X-acto
- Kraft paper or newspaper
- Mini hot glue gun & glue sticks
- Marker or tailor’s chalk
- Optional: paintbrush
Directions:
- Draw surfboard shape onto cardboard.
- Place cardboard onto cutting mat and cut out using an X-acto.
- Use this piece as a template and trace 2 more onto cardboard and cut out pieces. Now you have 3 surfboard shapes.
- Stack the shapes together to make sure they fit.
- Next glue the surfboard pieces together. Go to a well-ventilated area, ideally an outside area that is a good distance from people, cars, etc. Lay kraft paper on a flat surface and follow instructions on the can of spray adhesive to glue pieces together. We used Loctite High Performance Spray Adhesive. Spray both surfaces, wait a minute to let them dry, and then carefully stick them together. Repeat for remaining piece.
- Discard kraft paper and return to your work area.
- Clean up edges, if necessary, using an x-acto and a cutting mat.
- Using a pencil, mark dots on one side of the board. These represent the holes that you usually see on a real graham cracker.
- Take a straight pin and stick into each mark, piercing through all layers. Set pin aside.
- Place surfboard on top of brown felt. Draw outline with marker or chalk that is 0.5" larger than the board on all sides.
- Cut along line, and set excess felt aside.
- Now cut waves along the edges of the felt.
- Place felt onto one surface of the surfboard. Pin edges of felt to sides of board, making sure that the felt fits, and that the waves slightly overlap the sides. Trim edges if needed.
- Remove pins from one half of board and set aside.
- Fold felt over, exposing half of the board surface.
- Using mini hot glue gun, apply a dot of glue on top of pin holes, pressing felt down immediately. Start gluing the pinholes nearest the fold, working outward.
- When this half of the surface is complete, remove pins from other half and set aside.
- Repeat steps 15–17.
Note: the purpose of gluing the felt directly on top of the pin holes is to create slight indentations that emulate the subtle dips on a chocolate covered graham cracker.
- Now flip the surfboard over, felt side facing down.
- Use pencil tip or back end of a paint brush to enlarge the pin holes on the cardboard “graham” surface.
Surfboard Stand
Supplies & Tools:

- Foam, at least 1.5" thick
- 0.5 yard high loft batting
- Cutting mat
- X-Acto
- Mini hot glue gun & glue sticks
- Scissors
Directions:
- Lay cutting mat on a flat surface.
- Place foam on cutting mat, and cut a piece that is 8" x 4.5" with an X-acto. Discard excess foam.
- Keeping foam piece on the cutting mat, cut an opening into the middle that is big enough to hold the surfboard, but small enough to keep the surfboard in place. Set aside.
- Lay batting on a flat surface.
- Measure and cut an oval that is 7.5" x 4".
- Measure and cut a rectangle that is 12" x 14". Set excess batting aside.
- Take the oval piece and lay on top of the foam. Cut a line in the batting directly above the opening in the foam. The easiest way to cut a line in the middle (leaving the edges intact) is to fold the oval in half and cut an incision. Now unfold and compare to the length of the foam opening. Cut the line longer, if needed. Set aside.
- Take the rectangle and lay on top of the foam. Be sure that the batting hangs over the sides of foam. Cut a line in the batting directly over the opening in the foam.
- Next cut wavy lines or lumps around the edges of the rectangle to make it look like lumps of snow. Be careful not to cut too far into this piece of batting, since it needs to completely cover the block of foam.
- Using mini hot glue gun, glue the oval piece on top of foam, aligning the openings of batting and Lay the “rectangle” piece on top of foam. Glue batting around edges of foam.
- Now your surfboard stand is complete! You can cut little squares and circles out of batting scraps to make ice cubes and snowballs to scatter around the stand.