Skill Level:
Crafting Time:
Technique(s):
Category:
Surprisingly Simple Embellished Beeswax Candles
Share This Craft
Search Crafts
Surprisingly Simple Embellished Beeswax Candles

If you’ve never made candles with beeswax before, then you’re in for a real treat. These festive candles are easy enough for novice crafters to make, plus they don’t require very many supplies. Making a votive, pillar, or taper candle is the simplest way to go, but you can get as creative as you want with the embellishments. Once you get the basics down, you can let your imagination go wild! Keep reading to see our creations and get inspired.
Supplies & Tools:

- Beeswax candle cheat sheet (download here)
- 16.5" x 8" beeswax sheets, assorted colors*
- Cotton wick*
- Cutting mat
- Metal ruler
- X-Acto
- Optional: washi tape
- Optional: hair dryer or embossing heat tool
- Optional: non-stick scissors**
*You can get a beeswax candle kit that includes 10 beeswax sheets and wick here.
**Non-stick scissors are handy when cutting small pieces of wax for embellishing the candle.
Directions:
Before you begin, note that a little waxy residue will get left behind on your work surface, so make sure to put down a placemat or other protective barrier. We worked on our cutting mat, then cleaned it once we finished making candles.
- Cut beeswax sheet to desired size using X-Acto, metal ruler, and cutting mat. (Not yet sure what size candle to make? Check out our beeswax candle cheat sheet.)
- Cut a piece of wick 1/2" to 1" longer than the desired height of your candle, then lay the wick on the short edge of the beeswax. Wick has a top and a bottom, so make note of which end is the top by marking it with a piece of washi tape (or simply tie a knot). You want to make sure the wick is oriented correctly before you make your candle.
Note:The wick included in your candle kit should specify which end is the top.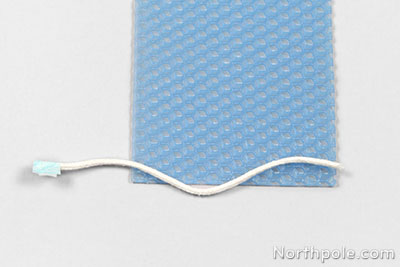
- Pinch the edge of the beeswax around the wick.
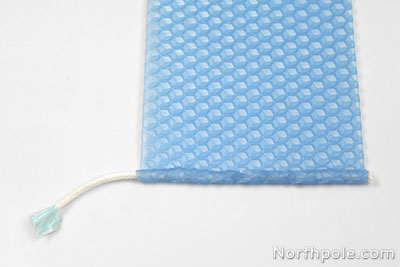
- Begin rolling the beeswax, using even pressure as you roll the candle. Be sure that the edges stay lined up.
Note: If the beeswax is brittle, soften it with a hair dryer or an embossing heat tool. Once the beeswax warms up a bit, it will be easier to roll.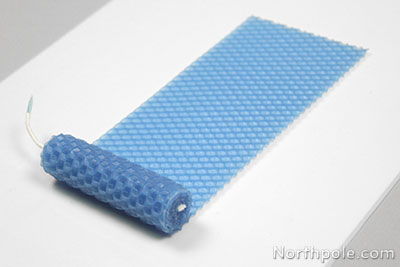
- When you’re finished rolling the candle, gently press down the edge to flatten it into the side of the candle.
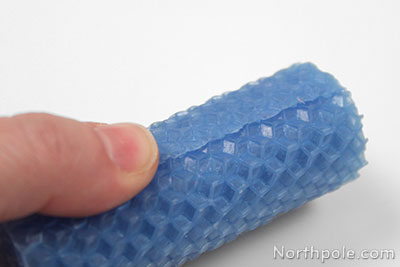
- Trim the wick to 0.25".
- Now you can decorate your candle quite easily! Simply press various shapes cut from beeswax onto the candle. Read on for some festive inspiration.
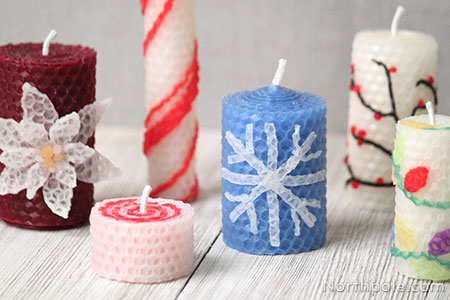
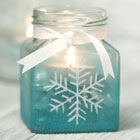
Simple Snowflake

Making a wintery snowflake candle is quick and easy! First, make a small pillar candle with 2 strips of 16.5" x 2.5" blue beeswax. (To learn how to construct the candle, see steps 3–4 on page 4 of the Beeswax Candle Cheat Sheet.) Next, cut thin strips of ivory beeswax (ours are 3/16" wide), then press the strips onto the candle to create a snowflake.
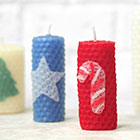
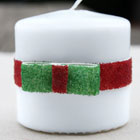
Candy Cane

By adding simple thick and thin stripes, you can instantly turn an ordinary candle into a candy cane candle! We made this 4" taper candle from an 8.25" x 4" piece of ivory beeswax, then added 1/8" and 1/4" strips of red beeswax. (Learn how to create this taper on page 2 of the Beeswax Candle Cheat Sheet.) Create a variety of festive candles by combining different colors: dark red stripes on a red candle, green stripes on a light green candle, or whatever other colors you like.

Christmas Lights

It’s not Christmas without some Christmas lights! To make this candle, roll up a 16.5" x 2.5" piece of ivory beeswax. (See page 1 of the Beeswax Candle Cheat Sheet.) Then cut small bulb shapes and a thin strip of green beeswax to add a strand of Christmas lights to your candle. Cutting the round bulb shapes can be a little tricky, so you may want to try this instead: cut small diamond shapes, then use your fingers to mold the beeswax into a bulb shape.
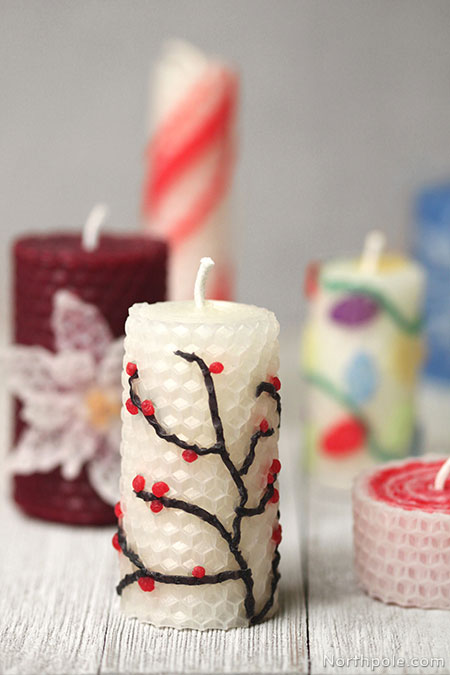
Winter Branches & Red Berries

This minimalist candle brings winter landscapes to mind. To make it yourself, roll a 3" tall ivory candle from beeswax that measures 23" x 3". Because the long side of a beeswax sheet is only 16.5", you will actually use two pieces of beeswax: 16.5" x 3" and 5.5" x 3". (To learn how to construct the candle with two pieces of beeswax, see steps 3–4 on page 4 of the Beeswax Candle Cheat Sheet.) After your candle is rolled, cut thin strips of black beeswax,then press onto the candle, bending and shaping the wax as needed to create natural-looking branches. Roll small bits of red beeswax between your fingers to create tiny berries, then press the berries onto the candle to give it a festive finishing touch.
3D Poinsettia

To add dimension, you can embellish with a 3-dimensional poinsettia for a festive, floral candle. Start by making a small pillar candle with 2 strips of 16.5" x 3" burgundy beeswax. (To learn how to construct the candle with two pieces of beeswax, see steps 3–4 on page 4 of the Beeswax Candle Cheat Sheet.) Then cut 6 large petals and 6 small petals. (For this, cut diamonds from ivory beeswax, then shape each diamond into an organic petal shape with your fingers.) Next, attach the large petals to the candle, pressing only the inner tip onto the candle. Leave the outer tips loose. Repeat with the small petals. To complete your poinsettia, roll bits of orange wax between your fingers to form little spheres, then press onto poinsettia’s center for the flower’s stamen.
Swirly Peppermint

Even though this cute candle has no embellishments on the outside, the red swirl on the inside makes us as happy as can be! Larger than a tealight, yet shorter than a votive, this little candle is a fun spin on a peppermint candy. To make this candle, stack and roll three 8" x 1" strips of beeswax together: 1 red and 2 ivory. We find that the easiest way to make this candle is to heat each strip individually, then quickly stack the pieces and roll the candle. After you roll up the candle, take another piece of ivory beeswax and wrap around the candle to hide the seams and give it a finished look.
Elfy Hints:
- Go ahead and use the beautiful candles you’ve created. After about a month, the colors will start to bleed, and the candles won’t look as stunning as they did when you first made them.
- Likewise, if you plan on giving these candles as gifts, don’t make them too far in advance.
Now that you’ve mastered the basics, make these other fun beeswax candles: