


Skill Level:
Crafting Time:
Technique(s):
Material(s):
Category:
Tag(s):
Share This Craft
Search Crafts
Monogrammed Cocktail Coasters

Disclosure: This article is sponsored by Sizzix®. They provided us with the Sizzix machine and dies used in this craft. All words and opinions are our own. For our full disclosure, click here.
If you’re planning a Christmassy cocktail party or an intimate dinner with friends, bring a special touch to the table with some handmade coasters. These lovely monogrammed coasters are perfect for newlyweds who want to show off their new shared last name or for anyone who wants their coasters to match the rest of their holiday party decorations.
When picking paper for your coasters, you’ll want a pretty pattern for the background and a solid color for the embossed layer to really show off the monogram. Since paper and cardstock are too thin to absorb water from icy beverages, we added a watercolor paper backing to make these coasters sturdy enough to withstand an evening of cocktails.
Supplies & Tools:

- Sizzix® Big Shot Plus Machine & included Cutting Pads, Platform, & Adaptor B*
- Sizzix Textured Impressions Embossing Folders 26PK – Eclectic Monograms
- Sizzix Bigz L Die – Circles, 2", 3" & 4"**
- Patterned cardstock***
- Solid colored cardstock with a white core
- Watercolor paper (or chipboard)
- Scissors
- Sandpaper, fine grit
- Spray adhesive, such as 3M™ Super 77™
- Permanent Scotch® Adhesive Dot Roller
*We used the Big Shot Plus machine, however, you can use the regular Big Shot machine to accomplish this craft.
**We used the die listed above, which includes 3 circles, but you could also use Sizzix’s 3" circle and 4" circle dies.
***We used paper from Basic Grey’s 25th & Pine and Aspen Frost collections.
Directions:
- Decide how many coasters you want to make for your party. Let’s say that you’ll need 10. You’ll need to die-cut ten 4" circles and ten 3" circles.
- Use spray adhesive to glue the watercolor paper and patterned cardstock together.
Note: Always use spray adhesive in a well-ventilated area and use newspaper to protect your work surface. - Die-cut 4" circles from the patterned cardstock/watercolor paper.
- Since you only need to die-cut the 4" circle, use scissors to cut a piece of patterned cardstock to fit over the 4" circle on the die.
- Lay the patterned paper face down over the 4" circle on the die. Place the die/paper between two cutting pads and roll this “sandwich” through the Sizzix machine to die-cut the circle.
- Discard the scraps and set the die-cut circle aside.
- Repeat to die-cut the remaining 4" circles.
- Following the steps outlined in step 2, die-cut 3" circles from the solid colored cardstock.
- Next, place one 3" circle in an embossing folder, making sure the monogram is centered.
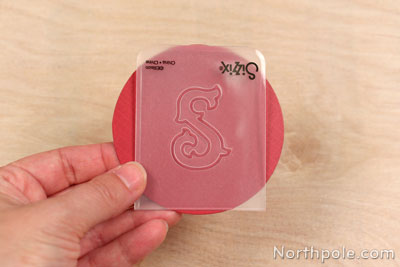
- In order to emboss, you’ll need to use the platform and adaptor B (included with the Big Shot Plus Machine) in addition to the cutting pads. Place the components together in this order (from bottom to top): Platform + Adapter B + Cutting Pad + Embossing Folder + Cutting Pad. (If this sounds a bit confusing, simply refer to the “cheat sheet” diagrams that are printed on the platform and adaptor B.)
- Roll this “sandwich” through the machine. Remove the embossed circle and set aside.
- Repeat steps 5–6 to emboss each 3" circle.
- Take a piece of sandpaper and gently sand the embossed monogram to expose the white core. Repeat for each embossed circle.
Note: A sanding block is helpful here, but regular ol’ sandpaper works just fine. Just be careful to sand only the embossed part.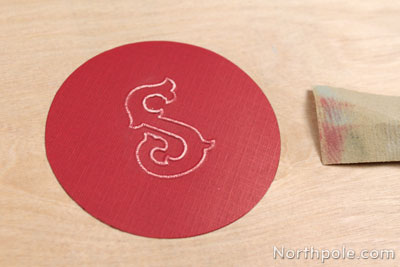
- Glue each embossed 3" circle in the center of a 4" circle with the adhesive dot roller.

- Now your custom coasters are finished!

Ideas from the Elves:
- Make a custom coaster for Santa’s cup of milk that you set out with cookies on Christmas Eve.
- Mix and match other pretty papers to create different color combinations.


