Skill Level:
Crafting Time:
Technique(s):
Material(s):
Category:
Tag(s):
Share This Craft
Search Crafts
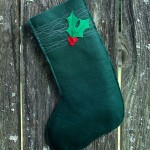
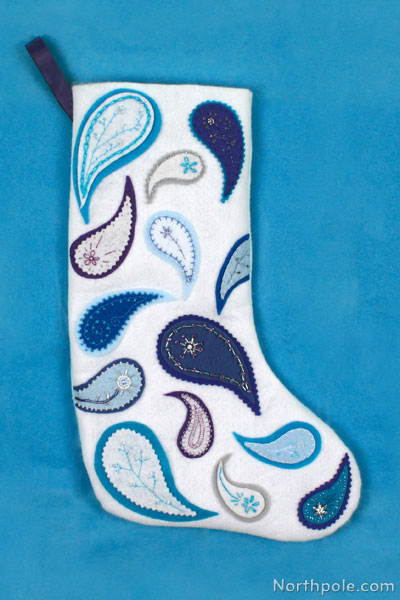
Wintery Paisley Stocking

This beautiful stocking has a richness that can be enjoyed at a distance and up close. From across the room, the vivid paisley shapes catch your eye as if they are jumping and swimming around. And upon closer inspection, you can admire the wonderful beadwork and embroidery contained within each individual droplet shape.
Are you ready to start making your own paisley stocking? If our wintery palette doesn’t suit you, make this stocking in hues that you love! To create your own color palette, start by choosing your main color and select various shades of it. (We chose an array of blues.) Then select an analogous color or two to round out your design (purple for our stocking). One trick to take your color scheme to the next level is to add a color that may feel contradictory (grey in our case). And finally, lay the felt sheets next to each other to see how they look together. Once you like what you see, you’re ready to start making!
Supplies & Tools:

- Printable template (download here)
- 0.5 yard white felt
- 1 felt sheet (9" x 12") of each: purple, dark blue, neon blue, cadet blue, brilliant blue, light blue, peacock, and grey
- 5/8" wide ribbon, 10" long
- Sewing machine
- Scissors
- Embroidery needle
- Straight pins
- Tape
- Marker
- Beading mat
- Beading needle (longer and thinner than a regular needle)
- #11 or #10 seed beads in a variety of colors: clear, shades of blue, white, and silver-lined
- Bugle beads: clear, light blue, and blue*
- Thread: white, dark blue
- Embroidery floss: blue, turquoise, white
- Fabri-Tac® glue
- Optional: 3mm faceted beads, 8mm flower beads, sequins
- Optional: metallic embroidery floss, metallic blending filament
- Optional: pinking shears
*You can find these colors in a multi-color bag of bugle beads. Pick out the blue and clear beads for this project and use the others for future crafts.
Directions:
- Print the template.
- Cut out the template pieces. To assemble the stocking template, line up the dashed lines, overlapping the shaded tabs, and tape pieces together.
- If needed, press the white felt with a cool iron to remove any wrinkles.
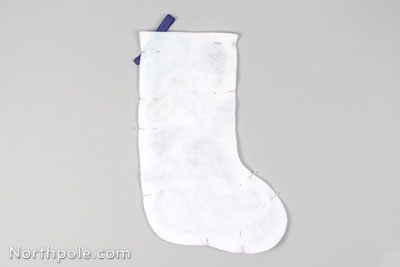
- Place the stocking pattern on the white felt and use the marker to trace 2 stocking shapes.
- Cut out the stocking shapes and set aside.
Note: Cut inside the marker line so that you don’t leave any marks on the stocking piece. - Trace and cut out various paisley shapes from the different colors of felt. You may pick and choose whatever colors you want in any shape, but here are a few recommendations:
- 3 pairs large shapes
- 4 pairs medium shapes
- 4 pairs small A shapes
- 3 pairs small B shapes
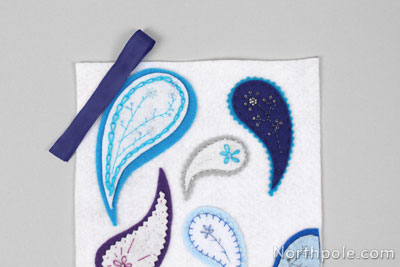
Optional: Cut the edges of some shapes with pinking shears. - Stack the inner and outer pieces of each pair together and lay them out on one of the stocking shapes. Distribute the shapes and colors evenly to make it look balanced. For example, don’t group all the large shapes in one area. If you’re not happy with your current layout, rearrange the pieces. You may even wish to cut more shapes to balance certain colors.
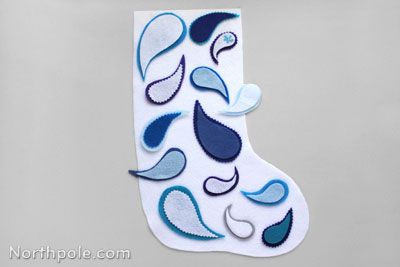
- Once you’re satisfied with the layout, pin the shapes in place. Or take a photo so you can reference the layout later.
- If any of your paisley shapes extend beyond the stocking’s edge, cut off the bit that hangs over the edge.
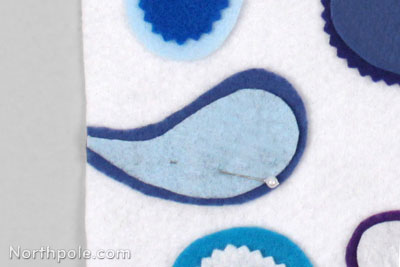
- One pair at a time, remove the pin that you added in step #8 and embellish the pair of paisley shapes. Add beads, embroidery stitches, or other embellishments to each pair of paisley shapes.
Note: It’s up to you whether or not you want to sew the pieces together as you are embroidering. We found that the felt warps and puckers when sewing/embellishing a single layer. Sewing through 2 layers of felt seems to help the felt keep its shape.
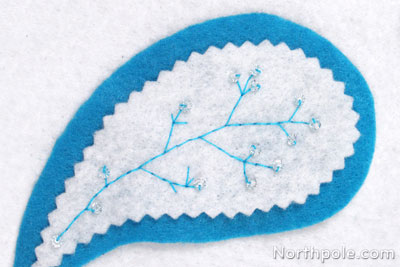
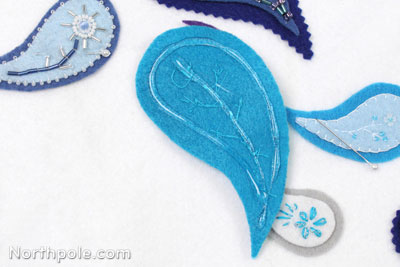
Here are some ideas for embroidering your shapes:- Use a backstitch to make icy branches and add clear seed beads or faceted beads to the tips.
- Add beads around the inner paisley shape and sew a paisley-shaped loop of beads inside.
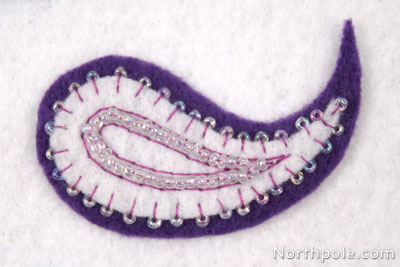
- Backstitch curly lines within the shape, then add dots by sewing French knots.
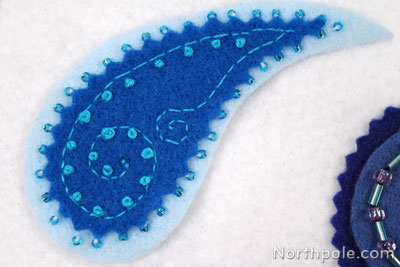
- Sew a flower using a lazy daisy stitch.
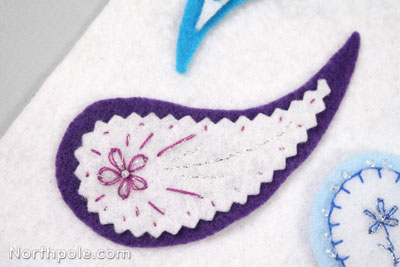
- Sew an outline with a chain stitch.
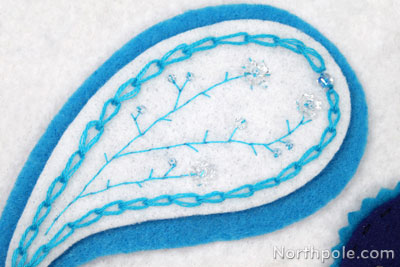
- Use metallic embroidery floss.
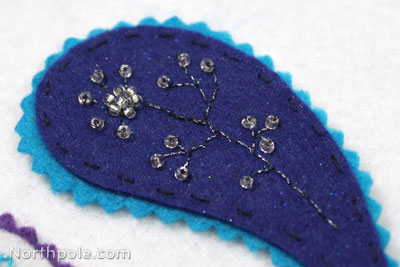
- Use a backstitch to make icy branches and add clear seed beads or faceted beads to the tips.
- If you did not sew the pieces within each pair together while embellishing, now use Fabri-Tac to glue them together.
- Now you are ready to attach the paisley shapes to the stocking. Make sure every shape is laid out on the stocking exactly how you want it. (If you snapped a photo in step 8, now would be a good time to reference it.) Use straight pins to hold each shape in place.
- Gluing one shape at a time, use Fabri-Tac to adhere each shape on the stocking. The glue is really strong, so for the small and medium shapes, you only need to outline the shapes with glue. For the larger pieces, you can also add a little bit more glue in the center.
- Once the glue is dry, check your work to see if any pieces need a bit more glue, such as the paisley tips. Carefully add glue where needed and allow to dry.
- Now put the stocking pieces together so you can sew them.
- Place the embellished stocking piece on the table, right side up.
- Fold the ribbon in half and place near the upper left corner of the stocking. The ends of the ribbon should extend past the left side the stocking while the loop of the ribbon extends above the top of the stocking.
- Place the blank stocking piece on top.
- Pin the pieces together.
- Begin sewing the stocking pieces together with your sewing machine, using a 0.25 seam allowance. Make sure you back tack at the beginning and then continue sewing.
Note: An easy way to get a 0.25 seam allowance is to align the edge of the felt with the presser foot. - Sew around the stocking, removing pins as you go. When you reach the end, back tack to lock the thread.
Note: When you sew over the ribbon, back tack over it and then sew forward again to reinforce the ribbon as it will make the hanger stronger. - Remove any remaining pins and set aside.
- Gently turn the stocking right side out and press the seam with a cool iron.
- Now your stocking is complete!