Skill Level:
Crafting Time:
Technique(s):
Material(s):
Category:
Share This Craft
Search Crafts
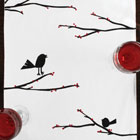
DIY Iron-On Appliqué

Iron-on appliqués are so easy and versatile! In this tutorial, you will learn how to make an appliqué and iron it onto a bread basket liner. You can purchase a liner (or a thin towel) from the store or you can sew your own. With fusible webbing, you can easily add appliqués onto many other projects, such as napkins, T-shirts, aprons, decorative pillows, tote bags, etc.
Finding the right webbing can be a challenge, even with the quick reference chart that is commonly found in large craft stores. Heat’n Bond Lite is lightweight and won’t stiffen your material, but you will need to sew the edges of the appliqué after it is ironed on. This type of webbing is ideal for wearable items and delicate materials, plus it’s good for layering appliqués. If you’d rather not sew the appliqué, then you can use Heat’n Bond Ultra Hold.
Supplies & Tools:

- Printable template (download here)
- Bread basket liner
- Fabric – any color(s) you like
- Fusible webbing, such as Heat'n Bond Lite (purple wrapper) or Ultra Hold (red wrapper)
- Scissors
- Tailor's chalk
- Iron
- Ironing board
Directions:
- Print the template and cut out pieces as desired.
- Pre-wash the basket liner and the fabric that you using for the appliqués. Do not use fabric softeners.
Note: It is important to pre-wash fabric because it shrinks when washed. If you skip this step, you may end up with a warped appliqué - Iron the liner and the fabric.
- Cut a piece of fabric and webbing larger than the appliqués that you are making. (A 12" square, for example.)
Note: We cut the webbing just slightly smaller (11.5" square) than the fabric to reduce the risk of getting any of the webbing stuck on our iron. (We’ve heard it’s a NIGHTMARE to get off your iron.) - Follow the manufacturer’s instructions for joining the fabric to the fusible webbing. (Check for recommended iron settings—temperature and length of time to press iron on fabric.)
- Iron the webbing onto the appliqué fabric. Begin pressing in the middle and work outward. Once finished, check the edges—if the fabric and webbing separates easily, then you need to iron some more.
- With a pencil or tailor’s chalk, trace the appliqué template. You can draw either on the fabric directly, or on the paper backing.
Note: If you trace on the backing, the image that you will get is the reverse of what you drew. Typically not a problem with figures such as holly or a tree, but it is problem if you are doing letters. To counteract this, you can simply trace the reverse of the template, which will give you the correct shape in the end. - Cut out appliqués.
- Peel paper backing and position on basket liner.
- Iron in place.